

Rights Management
Manage user access in VAULO at three levels: folder, Space, and organization — from inviting members to assigning individual roles.
In this how-to, you will learn how to grant colleagues access to content — on a single folder, an entire Space, or across the organization.
Rights management in VAULO is based on an inheritance method. Rights flow from the top down: organization → Space → folder. If you have already granted a user rights at the organization level, you cannot revoke these rights for individual Spaces or folders. If a user should only have access to a specific Space or folder, invite them to your organization with the role No rights. You then assign rights at the Space or folder level.
Grant rights on folder, Space, and organization
Choose the level at which access should apply. There is no bulk grant for “all users” — you assign the role per person, or let it inherit from a higher level.
Use the folder level when someone should only see a specific folder — for example training material — without access to the rest of the Space.
Open the folder.
Click Member management in the top right. Alternatively: right-click the folder → Folder settings → Member management tab.
Find the member in the Members & invitations list.
Click Edit member (pencil icon). The Manage member dialog opens.
In the General tab, choose a role with read access and click Save changes.
Use the Subfolder roles tab if rights should differ only for subfolders.
If the person is not yet a member of the organization, click Add member. Invite them with the role No rights, then assign the folder role as above. Without organization membership, the internal folder URL (/folder/…) does not grant access.
Use the Space level when someone should see the entire Space including its folders. The Space role is inherited by the folders.
Open the Space.
Click Member management in the top right. Alternatively: right-click the Space → Settings → Members tab.
Find the member in the Members & invitations list.
Click Edit member (pencil icon). The Manage member dialog opens.
In the General tab, choose the role for this Space and click Save changes.
Use the Folder roles tab for exceptions on individual folders. A highlighted badge is a direct assignment on that Space or folder; a plain badge is an inherited role.
If you select a Space and assign a role, it automatically applies to its folders. Individual folders override the inherited role only for themselves.
Use the organization level when someone should work in the organization in general. This role applies everywhere — unless you invite with No rights and then grant access only on individual Spaces or folders.
Open Organization settings (profile picture in the top right → gear next to the organization).
Switch to the Members & invitations tab.
Click Add member to invite someone new, or Edit member (pencil icon) next to an existing member.
Choose the organization role. For limited access, select No rights.
Optional: in the Space & folder roles tab, assign roles on individual Spaces and folders. Then click Save changes or Create invitation.
People outside the organization do not get access through the internal folder or Space URL. Create a share for them instead — Presentation or Direct download.
Member Management
To manage invitations and roles across the organization, you need the appropriate administrator rights. Navigate to your organization settings and open Members & invitations. There you will find the following overview:
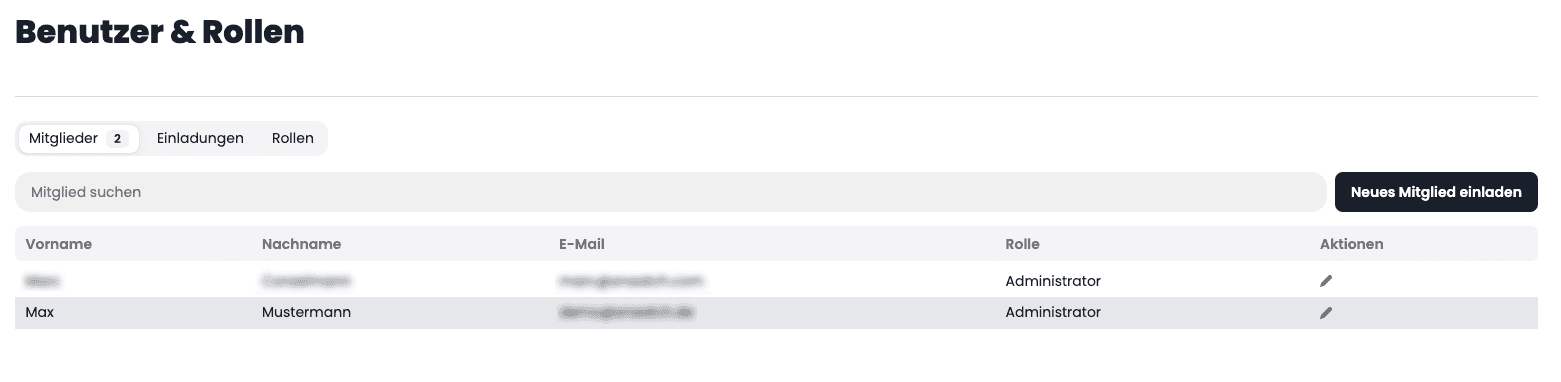
If you are using the VAULO Corporate Basic plan, from 2025 you will find three predefined roles under the Roles column that cannot be changed. Additionally, you can create one custom role. If you are using the Corporate PRO plan, you can create as many custom roles as you like.
Send New Invitation
To invite another user to your organization, go to the Invitations tab and click the Send new invitation button. A modal opens where you can enter the email address of the user you want to invite to your organization. If you want to invite multiple users at once, simply click the + in the Which email address should the invitation be sent to? row. In the dropdown below, you can directly select the desired role that the new user should receive at the organization level. If they should not be able to see certain Spaces and folders, we recommend choosing the No rights role when sending the invitation.
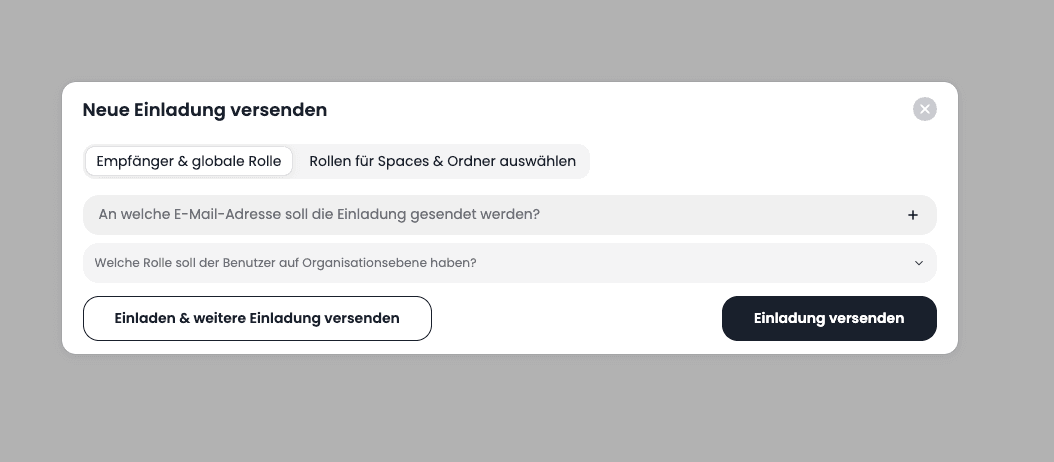
The contact will now receive an invitation by email that they must accept. Please note: If your contact registers with VAULO on their own, they will not belong to your organization. This is only possible through an invitation!
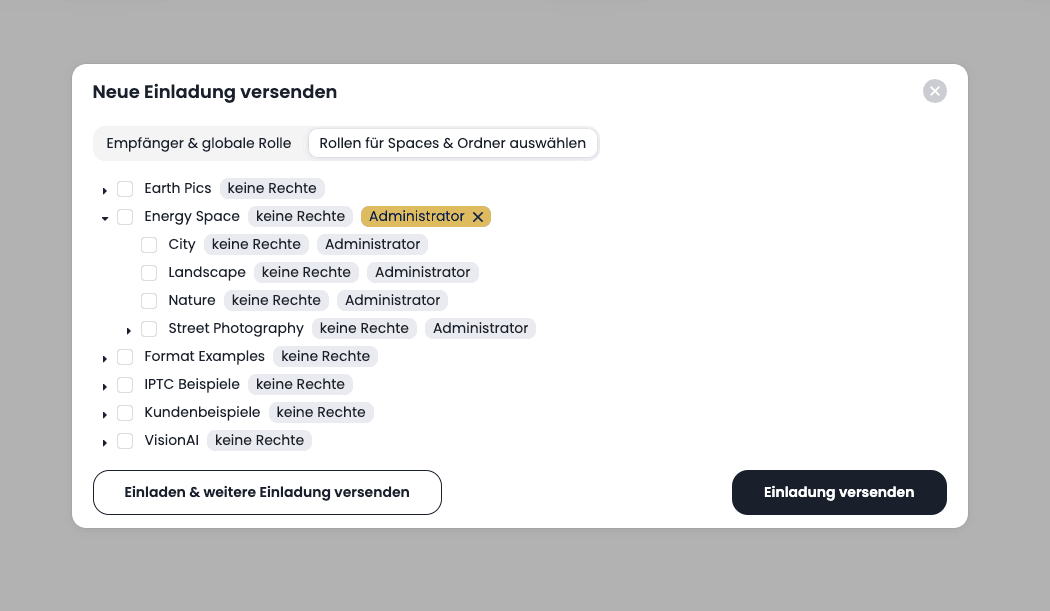
When sending the invitation, you also have the option to assign specific roles for Spaces & folders to the new user. To do this, switch to the Select roles for Spaces & folders tab in the Send new invitation modal.
You will now see an overview of all Spaces and folders. As soon as you click on a Space or folder, a dropdown appears where you can determine the role for the new user in the selected Space or folder. Click on Assign role. A gold-highlighted info box now appears behind the Space or folder where the user receives additional rights. The info box also shows the assigned right.
Gray-highlighted info boxes show the default role that the user has received. For example, if you have assigned the role No rights as the default role, it will be displayed behind every Space & folder in a gray info box. If, as in our example, you assign the user the Administrator role in the Energy Space, this is shown in gold at the Space level. In the individual folders of the Space, it appears in gray again, since the user has the role in these folders but it was only inherited.
You can see all open invitations in the Invitations tab. Once the user accepts the invitation, they appear in the Members tab.
Delete Member
In the Members tab, click the Pencil in the Actions column next to the member you want to delete. A modal opens with various tabs. Go to the Delete member tab and confirm the action by clicking the Delete member button.
Creating and Managing Roles
If you are using the VAULO Corporate Basic plan, from 2025 you will find three predefined roles under the Roles column that cannot be changed. Additionally, you can create one custom role. If you are using the Corporate PRO plan, you can create as many custom roles as you like.
To manage roles, click on the Roles tab in the Users & Roles management.
Create New Role
Click on Add new role. In the modal that opens, you can give the new role a name and add a description. Under the General rights tab, you can select the desired rights that the role holder should receive. We have divided the rights into three different levels: Organization level, Space level, Folder level, File level. Then click on Create role.
Assign New Role
In the Members tab, click the Pencil in the Actions column next to the member to whom you want to assign a new right. The following modal opens.
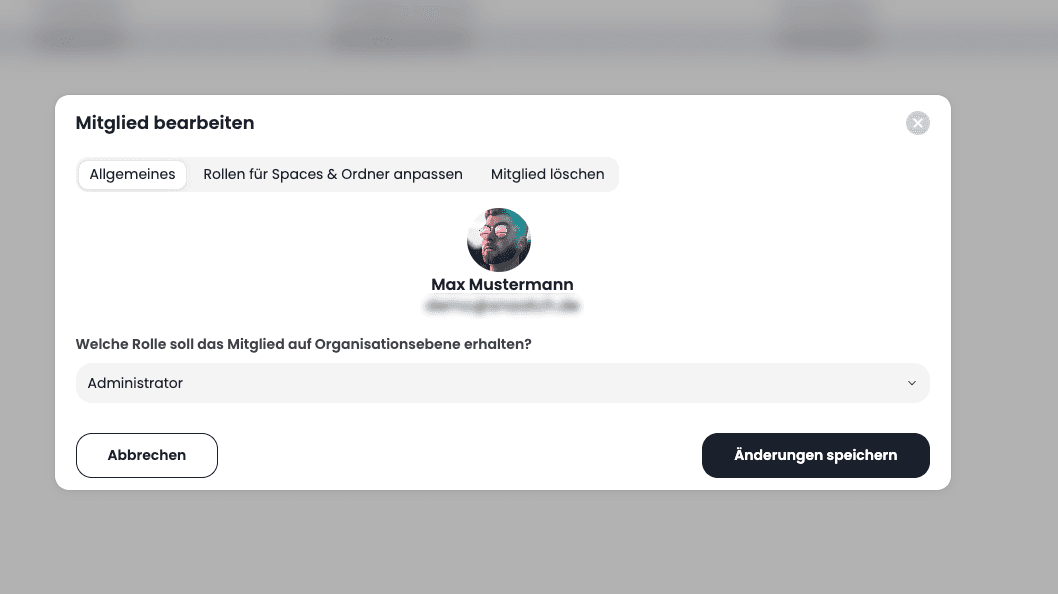
You can now see directly in the dropdown which role the member has at the organization level. Furthermore, in the Adjust roles for Spaces & folders tab, you can assign individual roles for folders & Spaces. In the Adjust roles for Spaces & folders tab, you can grant the member individual rights for Spaces and folders.
Terms of Use
In the Terms of Use section you can store organisation-wide policies that can be assigned to members when inviting them.
Add a term of use
On the Policies & Roles page, scroll to the Terms of Use section.
Click Add term of use.
Enter a descriptive name in the Name of term of use field.
Write the content in the editor. Type / to open the menu for formatting options such as headings, lists, or tables.
Click Create term of use to save.
The saved term of use will appear in the list and can be assigned when inviting new members. Use Edit to update the content at any time.